
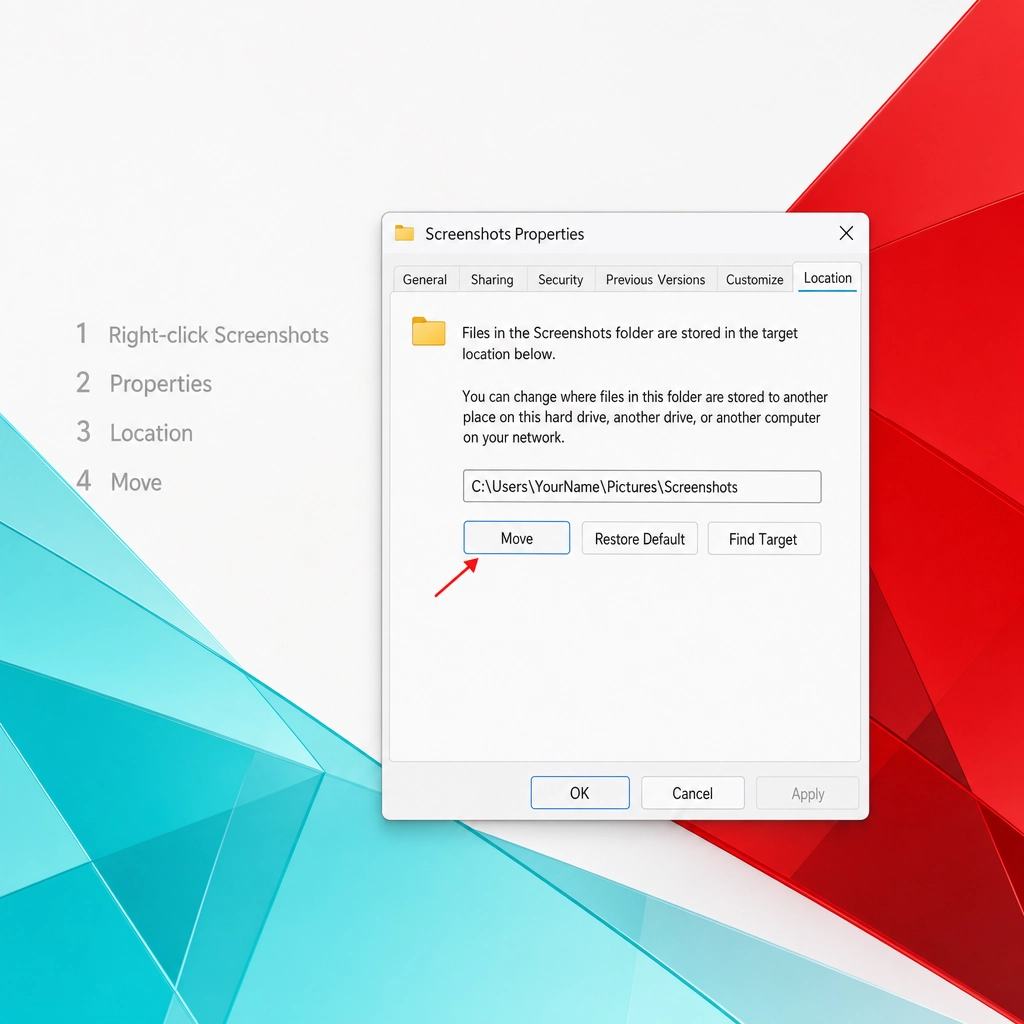
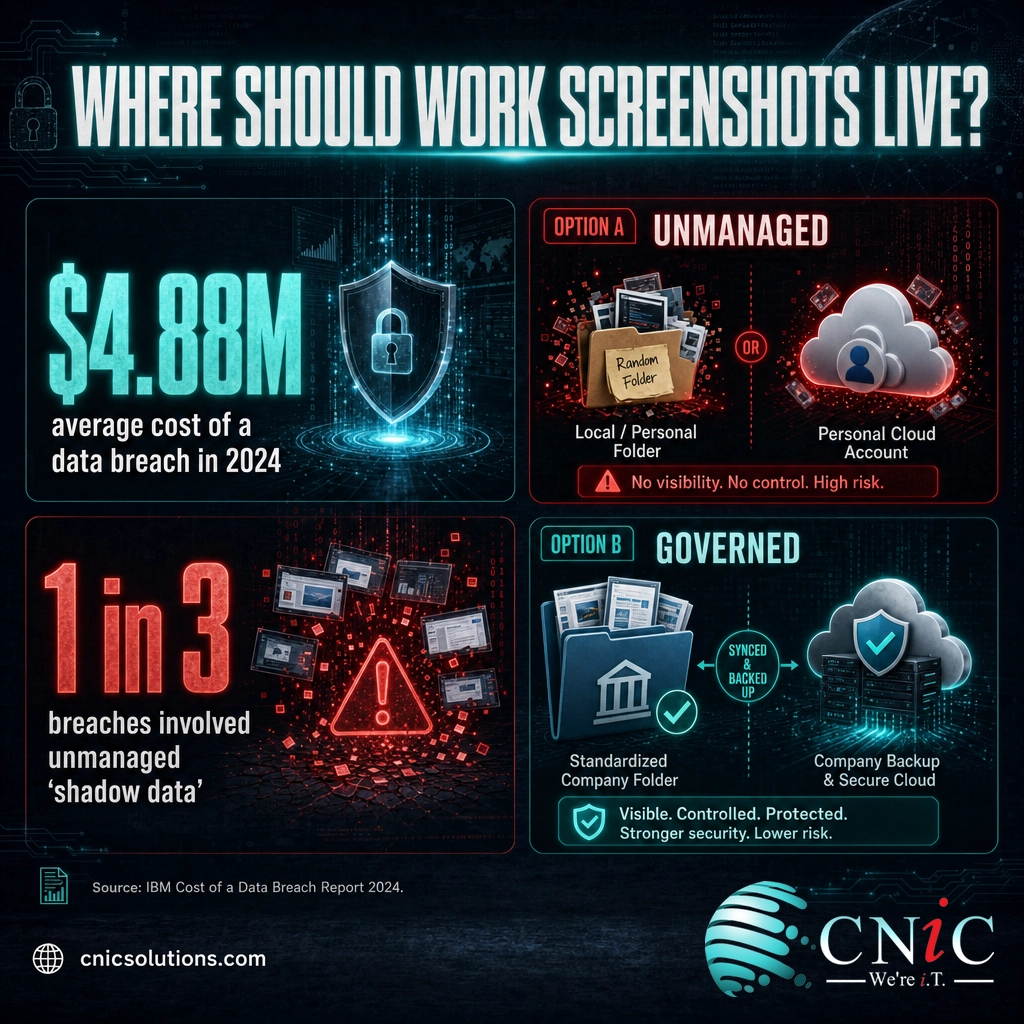
To change where Windows 11 saves your screenshots, open File Explorer, go to Pictures, right-click the Screenshots folder, choose Properties, open the Location tab, and click Move to pick a new folder. That single change redirects every future Win + Print Screen capture. It sounds like a small housekeeping tweak, but where your files land is a real business question: in IBM’s 2024 research, more than a third of data breaches involved “shadow data,” information sitting in unmanaged or unexpected locations, and the average breach reached $4.88 million. Screenshots routinely capture passwords, invoices, client records, and internal dashboards, so deciding where they save is worth two minutes of your time.
Key Takeaways
- Windows 11 saves Win + Print Screen captures to Pictures\Screenshots by default; move that folder from its Location tab to change where they go.
- The Snipping Tool and Xbox Game Bar each save to their own folders and are changed separately, so one setting does not cover all three.
- Always create the new destination folder before you move, because Windows merges the Screenshots folder into whatever folder you select.
- OneDrive can silently redirect your screenshots to the cloud; turn that off if captures should stay on the local PC.
- For a team, standardizing the screenshot location on every workstation keeps sensitive captures out of unmanaged folders and inside your backup scope.
What’s in This Guide
- First, Know Which Tool Saves Where
- Before You Begin
- Move the Screenshots Folder (Win + Print Screen)
- Change the Snipping Tool Save Location
- Change Where Xbox Game Bar Saves Captures
- Stop Screenshots From Going to OneDrive
- When to Standardize This Across Your Team
- Troubleshooting
- Keep Your New Setup Working
- Frequently Asked Questions
First, Know Which Tool Saves Where
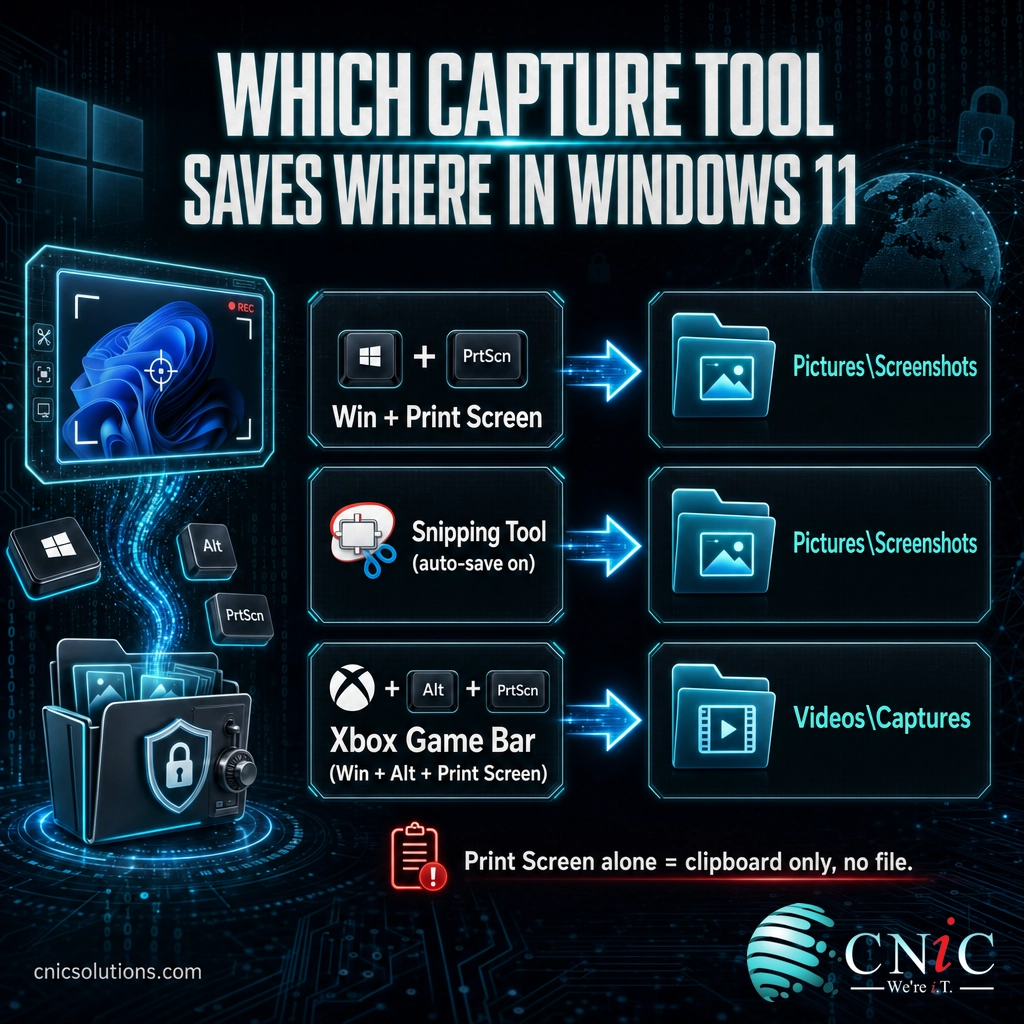
Most of the confusion around screenshot folders comes from a single fact: Windows 11 does not have one screenshot location. It has three, because three different capture tools each write to their own place. Before you change anything, match the way you take screenshots to the folder that actually receives them.
| How you capture | Where it saves by default | Creates a file? |
|---|---|---|
| Win + Print Screen | Pictures\Screenshots | Yes, a PNG file |
| Snipping Tool (auto-save on) | Pictures\Screenshots | Yes, when auto-save is enabled |
| Print Screen alone | Clipboard only | No, you paste it somewhere |
| Xbox Game Bar (Win + Alt + Print Screen) | Videos\Captures | Yes, a PNG or MP4 |
The takeaway: if your screenshots are not landing where you expect after you change a setting, you almost certainly changed the setting for a different tool than the one you are actually using. The rest of this guide handles each tool on its own so you can fix the exact path that matters to you.
Source: Microsoft Support, Use Snipping Tool to capture screenshots
Before You Begin
What you need first
- Time: about 2 minutes.
- Skill level: beginner. No command line, no registry editing.
- Access: a standard Windows 11 user account is enough to move your own folders.
- Do this first: create the folder you want screenshots to save into. Pick a spot that is always available (a folder on your main drive, or a work folder that syncs), not a USB stick you unplug.
One warning worth reading twice: when you point the Screenshots folder at another folder, Windows merges the two. Any files already in the destination stay, and your existing screenshots move in alongside them. Choose an empty or purpose-made folder to avoid mixing screenshots into a folder full of other files.
Move the Screenshots Folder (Win + Print Screen)
This is the method that matters for most people. It changes where every future Win + Print Screen capture is saved, and it is the closest thing Windows 11 has to a true “default screenshot folder” setting.
1 Create your destination folder
Open File Explorer and make the folder you want to use, for example D:\Screenshots or a folder inside your synced work drive. Do this before anything else.
Why it matters: Windows moves and merges the Screenshots folder into the target, so the target needs to exist first.
2 Open the Screenshots folder properties
In File Explorer, go to This PC > Pictures. Right-click the Screenshots folder and choose Properties.
What success looks like: a Properties window opens with tabs across the top, including a Location tab.
3 Use the Location tab to move it
Click the Location tab. You will see the current path (Pictures\Screenshots). Click Move, browse to the destination folder you created in step one, select it, and choose Select Folder.
Why it matters: the Location tab is the official way Windows redirects a known folder. This is more reliable than any third-party tweak.
Myth: “I changed the Snipping Tool folder, so Print Screen will save there too.” Not true. Win + Print Screen follows the Screenshots folder location you set here. The Snipping Tool has a completely separate auto-save setting. Changing one does not touch the other, which is the single most common reason people think the change “did not work.”
4 Apply and move your existing files
Click Apply. Windows asks whether to move the existing screenshots to the new location. Click Yes so your history moves with the setting, then click OK.
What success looks like: the Location tab now shows your new path, and your old screenshots are already in the new folder.
5 Take a test screenshot
Press Win + Print Screen. The screen dims for a moment. Open your new folder and confirm the fresh capture is there.
Why it matters: a two-second test now saves you from discovering a week of screenshots in the wrong place later.
Source: Microsoft Support, Use Snipping Tool to capture screenshots
Getting file locations right on one PC is simple. Getting them right, and backed up, on every machine in a business is exactly the kind of standardization a managed IT partner handles quietly in the background.
See how managed IT keeps every workstation configured the same way
Change the Snipping Tool Save Location
If you capture with the Snipping Tool (Win + Shift + S, or opening the app directly), it has its own auto-save behavior. When auto-save is on, snips also land in Pictures\Screenshots, but you change that folder inside the app, not from the Location tab.
- Open the Snipping Tool app.
- Click the See more button (the three dots) in the top-right corner, then choose Settings.
- Find Automatically save original screenshots and make sure it is turned on.
- Under Screenshots are saved to, click Change and pick the folder you want.
What success looks like: the folder name shown under “Screenshots are saved to” updates to your chosen location, and new snips save there automatically.
Keep in mind that this setting only governs the Snipping Tool. Your Win + Print Screen captures still follow the Screenshots folder location from the previous section.
Source: Microsoft Support, Use Snipping Tool to capture screenshots

Change Where Xbox Game Bar Saves Captures
Screen recordings and captures made with Xbox Game Bar (Win + G, or Win + Alt + Print Screen for a still) do not use the Screenshots folder at all. They save to Videos\Captures. Windows Settings does not offer a button to change this location, so you move the Captures folder the same way you moved Screenshots.
- Create your new destination folder first.
- In File Explorer, go to This PC > Videos.
- Right-click the Captures folder and choose Properties.
- Open the Location tab, click Move, and select your new folder.
- Click Apply, choose Yes to move existing files, then OK.
Why this trips people up: people search Settings > Gaming > Captures expecting a folder picker and do not find one. The folder Location tab is the supported route.
Source: Microsoft Support, recording your screen with Xbox Game Bar
Stop Screenshots From Going to OneDrive
If your captures keep ending up in the cloud instead of the folder you chose, OneDrive is the usual culprit. OneDrive has a feature that automatically backs up screenshots, and when it is enabled it redirects your Pictures and Screenshots folders into OneDrive. That is convenient for some people and a problem for others.
To turn it off:
- Click the OneDrive cloud icon in the taskbar notification area, then open its Settings (the gear).
- Go to Sync and backup.
- Open Manage backup and turn off the Pictures folder. Because the Screenshots folder lives inside Pictures, this is what stops captures from syncing to the cloud in current versions of OneDrive.
- On older OneDrive versions you may instead see a dedicated Save screenshots I capture to OneDrive toggle in this same section. If it is there, turn it off. Microsoft has removed that standalone toggle from recent versions, so if you do not see it, use the Pictures backup control above.
Do not turn this off blindly on a work computer. For many businesses, having screenshots sync to a company-managed OneDrive is the safe outcome, because it means those files are backed up and governed. The goal is not “no cloud,” it is “the right location on purpose.” If you are unsure whether your captures should live locally or in a managed cloud folder, that is a policy decision worth getting right, not a toggle to flip on a whim.
Source: Microsoft Support, Save screenshots to OneDrive automatically
When to Standardize This Across Your Team
Changing a screenshot folder on your own laptop is a two-minute job. Doing it well across a company is a different question. If your team captures screenshots that contain client data, financial figures, patient information, or login screens, then where those files sit is a data-governance issue, not a personal preference.
This is the point where a quick tweak turns into a policy. If you reach this step and you are responsible for more than a handful of machines, it is worth deciding, once, where captures should live on every device, whether they should be backed up, and who can reach them. That consistency is exactly what keeps sensitive files out of the unmanaged, unexpected locations that drive breach costs up.
An IT partner can push a single standard to every workstation, confirm the right folders are inside your backup scope, and document the policy so it holds as staff come and go. A clear data-handling policy set at the leadership level turns “where do screenshots go” into a decision made once instead of a habit left to chance.
Keep sensitive captures out of unmanaged folders
Source: IBM, Cost of a Data Breach Report 2024
Troubleshooting
Most screenshot-folder problems come down to changing the wrong setting or a syncing tool quietly overriding your choice. Here are the fixes for the issues that come up most often.
| Problem | Likely cause | Fix |
|---|---|---|
| Screenshots still save to the old folder | You changed the setting for a different tool than the one you use | Match the tool to its setting: Win + Print Screen uses the Screenshots Location tab; the Snipping Tool uses its own auto-save setting |
| Captures keep going to OneDrive | OneDrive screenshot backup is on and redirecting Pictures | Turn off “Save screenshots I capture to OneDrive” in OneDrive settings |
| The Location tab is missing | You right-clicked a library or the wrong folder | Navigate specifically to Pictures\Screenshots (or Videos\Captures) and right-click that folder |
| Old screenshots seem to have vanished | They merged into the destination folder you selected | Open the new destination folder; the files are there, mixed in with any existing contents |
| Win + Print Screen does nothing | Pressing Print Screen alone only copies to the clipboard | Use Win + Print Screen to write a file, or paste the clipboard image into an app |
Keep Your New Setup Working
Once your screenshots save where you want, a little maintenance keeps them that way:
- Confirm it survives updates. Major Windows feature updates rarely reset folder locations, but a quick test screenshot after a big update confirms nothing moved.
- Check your backup covers the new folder. If you moved screenshots off your default Pictures path, make sure whatever backs you up (OneDrive, a company backup, an image-level backup) still includes the new location.
- Keep the destination available. If you pointed screenshots at an external or network drive, captures can fail when that drive is offline. A permanently connected location avoids gaps.
- Revisit it when devices change. New laptops start at the default again, so a new machine needs the same change to stay consistent.
The reason ongoing management matters is that a setting is only as good as the day someone last checked it. On a single personal PC that check is on you. Across a business, making sure the right folders are actually inside your backup is the difference between “we changed a setting” and “we know our files are protected.”
Make sure the folders that matter are backed up
Frequently Asked Questions
Where does Windows 11 save screenshots by default?
Does changing the Snipping Tool save folder also change where Print Screen saves?
Can I save screenshots directly to an external drive or network folder?
How do I move the Screenshots folder back to the default location?
Why are my screenshots going to OneDrive instead of my PC?
About This Guide
Steps verified against Microsoft’s official Windows and Snipping Tool documentation for Windows 11. Default folder paths reflect a standard Windows 11 installation and may differ if your organization applies custom folder redirection or group policy.
Data-governance figures are from the IBM Cost of a Data Breach Report 2024, which found a global average breach cost of $4.88 million and that more than one-third of breaches involved shadow data stored in unmanaged sources.
Sources: Microsoft Support, Snipping Tool | IBM Cost of a Data Breach Report 2024



related posts
What Is Network Penetration Testing? Types and Process
October 25, 2026Network penetration testing is a controlled, authorized simulation of a real cyberattack on your network, run…
What Is NIST Compliance? Frameworks, Requirements, and Who Needs It
October 25, 2026NIST compliance means aligning your organization's security program with the cybersecurity standards published by the National…
What Is MFA? How Multi-Factor Authentication Protects Your Accounts
October 24, 2026Multi-factor authentication (MFA) is a security method that requires two or more separate proofs of identity…
What Is Mobile Device Management (MDM)? A Guide for Businesses
October 24, 2026Mobile Device Management (MDM) is software that lets an organization remotely enroll, configure, secure, and monitor…